Virtual Lego
{brickr} is a fun package by Ryan Timpe that lets you build 2D mosaics and 3D models with Lego-like virtual bricks,1 with a little help from Tyler Morgan Wall’s {rayshader} package.
You can get started with the brickr toybox, which lets you arrange bricks in a spreadsheet that {brickr} can turn into a 3D model.
Kick-off
I’ve written a function called create_brickr_player() that lets you build a soccer player and select the brick colours for the shirt, socks, and much more.
It lets you create the same model but change the brick colours with minimum fuss.
The (completely untested) function lives in my package of misc functions, {dray}, which can be installed from GitHub.
# Load packages
library(dray)  # remotes::install_github("matt-dray/dray")
library(brickr)  # install.packages("brickr")
library(dplyr)  # install.packages("dplyr")
The function is simple. It helps you create a data frame that specifies the location and colour of individual bricks on successive 2D planes to build up a 3D model.
This data frame is a plan that can be interpreted by {brickr} and transformed into a special list that can be rendered in 3D space.
Here’s what happens when you use the function with default arguments.
player_plan <- create_brickr_player()
player_plan  # preview the object
## # A tibble: 45 x 6
## Level `1` `2` `3` `4` `5`
## <chr> <dbl> <dbl> <dbl> <dbl> <dbl>
## 1 A 0 0 0 0 0
## 2 A 0 2 0 2 0
## 3 A 0 2 0 2 0
## 4 B 0 0 0 0 0
## 5 B 0 7 0 7 0
## 6 B 0 0 0 0 0
## 7 C 0 0 0 0 0
## 8 C 0 1 0 1 0
## 9 C 0 0 0 0 0
## 10 D 0 0 0 0 0
## # … with 35 more rowsEach layer of bricks gets a separate value in the Level column.
The x-dimension is represented by the rows of the data frame and the y-dimension by the numbered columns.
Every non-zero number represents a brick and each value represents a different colour.
For example, layer A has dimensions of 3 x 5 where 4 spots will be filled with a brick. Each of these has the value ‘2’, which encodes the colour black. Layer B, meanwhile, has a couple of bricks with value ‘7’, which is bright red.
How do you know which numbers encode which colours? You can access the codes from the lego_colors data frame in the {brickr} package.
select(lego_colors, brickrID, Color, hex) # colour codes## # A tibble: 39 x 3
## brickrID Color hex
## <int> <chr> <chr>
## 1 1 White #F2F3F2
## 2 2 Black #1B2A34
## 3 3 Medium stone grey #A3A2A4
## 4 4 Dark stone grey #635F61
## 5 5 Bright green #4B974A
## 6 6 Bright blue #0D69AB
## 7 7 Bright red #C4281B
## 8 8 Bright yellow #F5CD2F
## 9 9 Bright orange #DA8540
## 10 10 Dark orange #A05F34
## # … with 29 more rowsClick for full brick colour codes
| Colour ID | Colour | Hex code |
|---|---|---|
| 1 | White | #F2F3F2 |
| 2 | Black | #1B2A34 |
| 3 | Medium stone grey | #A3A2A4 |
| 4 | Dark stone grey | #635F61 |
| 5 | Bright green | #4B974A |
| 6 | Bright blue | #0D69AB |
| 7 | Bright red | #C4281B |
| 8 | Bright yellow | #F5CD2F |
| 9 | Bright orange | #DA8540 |
| 10 | Dark orange | #A05F34 |
| 11 | Bright yel. green | #A4BD46 |
| 12 | Brick yellow | #D7C599 |
| 13 | Light royal blue | #9FC3E9 |
| 14 | Light purple | #E4ADC8 |
| 15 | Cool yellow | #FDEA8C |
| 16 | Light nougat | #FCC89B |
| 17 | Medium azur | #71C5E8 |
| 18 | Aqua | #B9DCD2 |
| 19 | Lavendar | #CAA2DD |
| 20 | Spring yel. green | #D4EB8E |
| 21 | Medium blue | #6E99C9 |
| 22 | Sand blue | #74869C |
| 23 | Dark azur | #3337C6 |
| 24 | Medium lavendar | #A05EB5 |
| 25 | Sand green | #789081 |
| 26 | Dark green | #287F46 |
| 27 | Earth blue | #203A56 |
| 28 | Nougat | #CC8E68 |
| 29 | Sand yellow | #958A73 |
| 30 | Dark red | #7B2E2F |
| 31 | Flame yel. orange | #E8AB2D |
| 32 | Bright purple | #CD6298 |
| 33 | Medium nougat | #AA7D55 |
| 34 | Bright reddish violet | #923978 |
| 35 | Medium lilac | #330072 |
| 36 | Reddish brown | #694027 |
| 37 | Olive green | #737B4C |
| 38 | Earth green | #27462C |
| 39 | Dark brown | #31261D |
So ‘1’ is white, ‘2’ is black and so on. I think Timpe selected this set of colours to match the colours available from Lego sets.
Boring, boring Arsenal
To actually build the model, pass the data frame to a couple of {brickr} functions.
The first is bricks_from_table() that converts the data frame to a list containing several elements that define the required bricks and colours.
# Convert plan to list with brick types and colours
player_bricks <- player_plan %>%
  bricks_from_table()

names(player_bricks)  # see the element names
## [1] "Img_lego" "Img_bricks" "ID_bricks" "mosaic_type" "pieces"As a side note, you can use display_pieces() to find out the set of pieces you’ll need to recreate the model in real life!
display_pieces(player_bricks)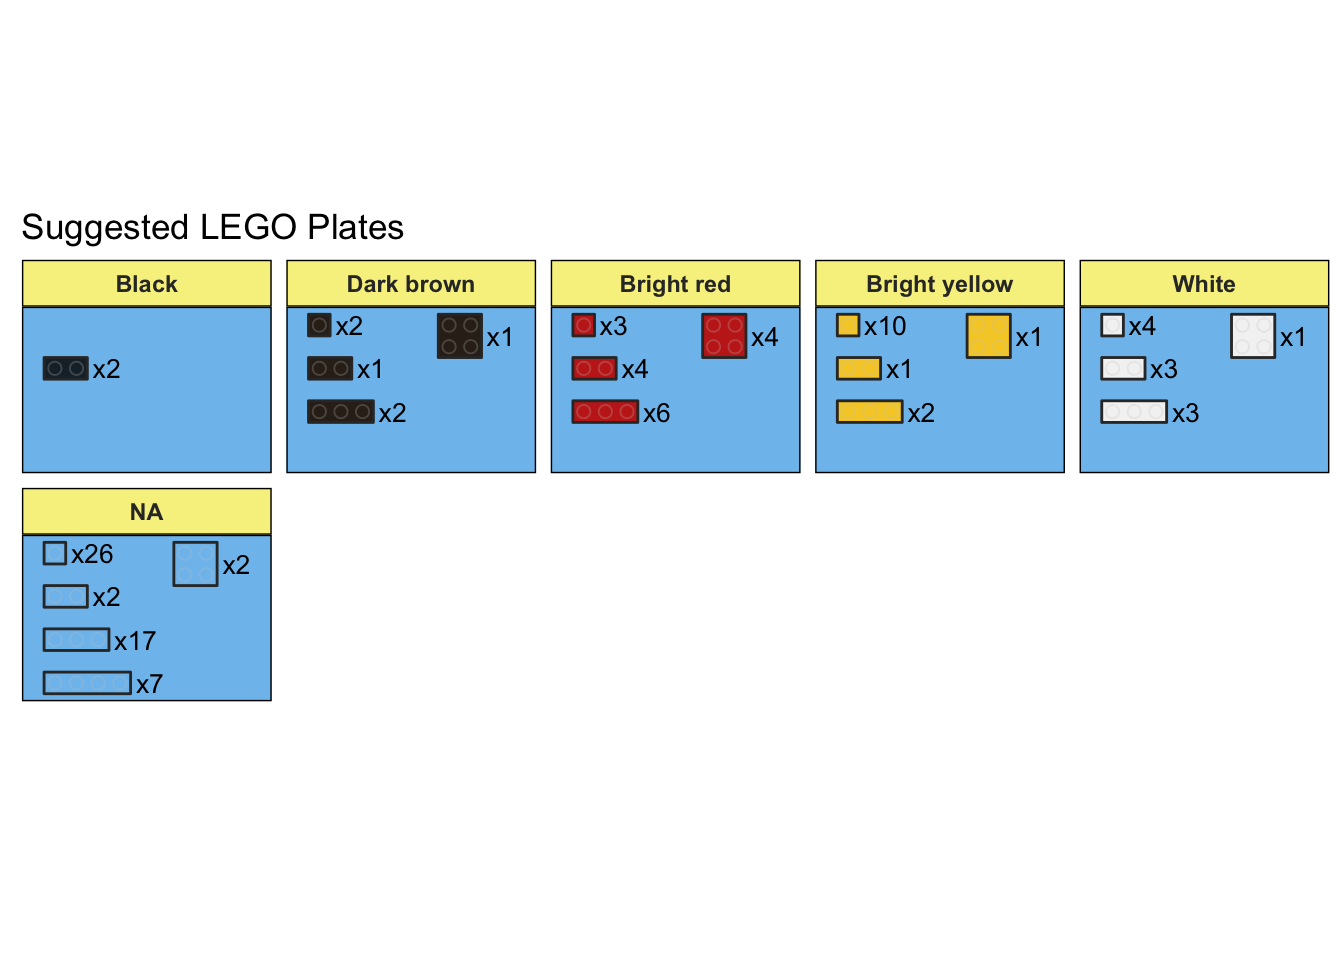
Pass the list object to the display_bricks() function to get the plan rendered into 3D. This opens a new device window and the model will be built up layer by layer. When complete, you can use your mouse to click and drag the object to look at at from all directions.
display_bricks(player_bricks) # opens separate window
So the default set builds up to make a player that has red socks with white trim, white shorts, and a red shirt with white sleeves. An Arsenal player, of course.2
Show your support
To change the colour of the player’s shirt you just need to change all the bricks associated with the shirt. This could be tedious by hand, so create_brickr_player() has an argument to do exactly this. Set shirt_body_col to ‘6’ to make it bright blue, for example.
You can change more than the shirt colour. Here’s the current set of arguments:
shirt_body_colandshirt_sleeve_colshorts_colsock_colandsock_trim_colboot_colhair_colandskin_col
So you could create a Manchester City player with the following:
# Build player plan with certain colours
man_city <- create_brickr_player(
  hair_col = 2,           # Black
  skin_col = 39,          # Dark brown
  boot_col = 7,           # Bright red
  shirt_body_col = 13,    # Light royal blue
  shirt_sleeve_col = 13,  # Light royal blue
  shorts_col = 1,         # White
  sock_col = 27,          # Earth blue
  sock_trim_col = 27      # Earth blue
)

# Convert plan to list and render it
man_city %>%
  bricks_from_table() %>%
  display_bricks()
In fact, this is a faithful rendering of the 2019 Premier League winner, FA Cup winner, League Cup winner, PFA Team of the Year inductee, PFA Young Player of the Year and FWA Footballer of the Year Raheem Sterling. Obviously.
I’ve added a couple more to a GitHub Gist. Feel free to add more.
Extra-time
Hopefully this is useful for anyone who wants to create the same {brickr} model in multiple colours. I realise that might be a niche audience.
The obvious next step would be to allow for features of the plan to change. For example, you could set an argument for player_height and add or remove layers from the plan to make the final model taller or shorter. Or maybe different shirt types could be specified, like horizontal_stripe = TRUE.
Pull requests always welcome!
Session info
## [1] "Last updated 2019-09-08"## R version 3.5.2 (2018-12-20)
## Platform: x86_64-apple-darwin15.6.0 (64-bit)
## Running under: macOS High Sierra 10.13.6
##
## Matrix products: default
## BLAS: /Library/Frameworks/R.framework/Versions/3.5/Resources/lib/libRblas.0.dylib
## LAPACK: /Library/Frameworks/R.framework/Versions/3.5/Resources/lib/libRlapack.dylib
##
## locale:
## [1] en_GB.UTF-8/en_GB.UTF-8/en_GB.UTF-8/C/en_GB.UTF-8/en_GB.UTF-8
##
## attached base packages:
## [1] stats graphics grDevices utils datasets methods base
##
## other attached packages:
## [1] dplyr_0.8.1 brickr_0.0.0.9200 dray_0.0.0.9000 kableExtra_1.1.0
## [5] knitr_1.23
##
## loaded via a namespace (and not attached):
## [1] wordcloud_2.6 tidyselect_0.2.5 xfun_0.7
## [4] purrr_0.3.2 colorspace_1.4-1 vctrs_0.1.0
## [7] htmltools_0.3.6 viridisLite_0.3.0 yaml_2.2.0
## [10] utf8_1.1.4 rlang_0.4.0 pillar_1.4.1
## [13] glue_1.3.1 RColorBrewer_1.1-2 plyr_1.8.4
## [16] stringr_1.4.0 munsell_0.5.0 blogdown_0.11
## [19] gtable_0.3.0 rvest_0.3.4 evaluate_0.14
## [22] labeling_0.3 gifski_0.8.6 fansi_0.4.0
## [25] Rcpp_1.0.2 readr_1.3.1 scales_1.0.0
## [28] backports_1.1.4 plotrix_3.7-6 webshot_0.5.1
## [31] ggplot2_3.1.1 hms_0.4.2 digest_0.6.19
## [34] stringi_1.4.3 bookdown_0.9 grid_3.5.2
## [37] cli_1.1.0 tools_3.5.2 magrittr_1.5
## [40] lazyeval_0.2.2 tibble_2.1.3 crayon_1.3.4
## [43] tidyr_0.8.3 pkgconfig_2.0.2 zeallot_0.1.0
## [46] xml2_1.2.0 lubridate_1.7.4 assertthat_0.2.1
## [49] rmarkdown_1.13 httr_1.4.0 rstudioapi_0.10
## [52] R6_2.4.0 compiler_3.5.2Not an official product (yet).↩
Why Arsenal? Mostly to demonstrate that sleeves can be a different colour to the shirt body, but also because they just got binned 4-1 by Chelsea in the Europa League final and I feel sorry for them.↩